Hello!
How are you going today? It's the last day of school holidays here and I am putting off ironing the school shirts that have sat in the ironing basket since before Christmas. I'll probably end up ironing them while the boys have their showers in the morning. Nothing like the last minute to get things done in my house!
So I am writing this instead. Much more important.
You might remember these polkadot squares that I crocheted a while ago? Or you may not.
Anyway, I have finally finished writing the pattern down and doing a little photo tutorial on how I made them. It is very simple, and you probably don't need a tutorial, but I thought it might help if you are just starting out in crochet.
I will put the pattern at the bottom of this post if you just want to skip straight to the concise version.
Ok here we go, happy hooking and good luck!
POLKADOT SQUARES
This is for a circle in a square type granny, using single crochet sts to create a nice solid piece. I didn't want it to be 'gappy'. It is easy too play around with colour combos and different stripey effects too.
I used a 3.5 mm hook and 8 ply Bendigo Knitting Mills Cotton in a variety of colours, but you could try this in any yarn I think.
This pattern is in US. stitches, sorry UK ladies, for you, sc =dc, hdc =htr, dc =tr
 |
| round 1 |
First, Chain 4 and slip stitch to 1ch to make a ring/circle.
Rd 1 : Ch1 (counts as first st) then do 5 sc into ring.Sl st to first ch to close round. (6st in total)
Rd 2 : Ch1 (counts as first st) then 1 sc in same stitch, then 2 sc in each st to end. Sl st to first ch to close round. (12 st in total)
 |
| round 3 |
Rd 3 : Ch 1,* 2sc in next st, then 1sc in next, * , continue pattern around. Sl st in first ch to close round. (18 st in total)
 |
| round 4 |
Rd 4 : Ch 1, sc in next st, then * 2sc next st then sc in next 2st * continue pattern around. Sl st in first ch to close ring. (24 st in total)
 |
| round 5 |
Rd 5 : Ch 1, sc in next 2st, then *2sc in next st, then sc in next 3st * continue pattern around, sl st in first ch to close (30 st in total)
 |
| round 6, and changing colour step 1 |
Rd 6 : Ch 1, sc in next 3st, then *2sc in next st, then sc in next 4st * continue pattern around, sl st to close. (36 st in total)
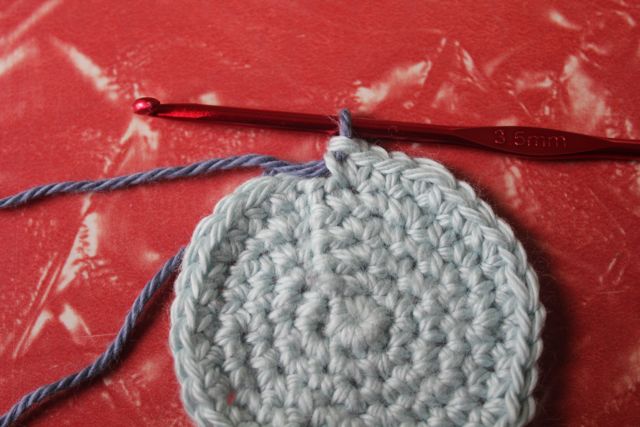
I changed colour at the end of this round to add a stripe of dark blue for rd 7.
This is how I change colours so it is a subtle, smoothish join.
In the last sc of Rd 6, before you do the yarn over and pull through, change to the new colour....
 |
| changing colours step 2 |
...and pull it through the old colour loops. Pull the old colour yarn gently to tighten the stitch, and slip stitch in the first ch with the new colour to close the round. Continue with next round as normal.
 |
| changing colours step3 |
I leave the old colour still connected and just change back when I want a different stripe.
(does that make sense??)
 |
| round 7 |
Rd 7 : Ch 1, sc in next 4 st, then* 2sc in next st, then sc in next 5 st * continue pattern around, sl st to close, changing colour back to light blue at end of round. (42 st in total)
 |
| round 8 |
Rd 8 : Ch 1, sc in next 5 st, then *2sc in next st, then sc in next 6 st* continue pattern around, sl st to close round . (48 st in total) Bind off. ( inner circle completed)
 |
| round 9 pattern repeat x4 |
( Squaring up) Rd 9 : Join 3rd colour (green) in any stitch, to create the 4 corners of the square, repeat the following pattern 4 times - 3sc, then 3hdc, then 3dc in next st, then 3hdc, then 2sc.
Sl st to first ch that counted as first sc, to close round.
 |
| round 9 complete |
This is how it is looking at this point. ^
 |
| round 10 |
Rd 10 :*2 sl st, then 4 sc, then 1hdc, then 4dc in next st, then 1 hdc, then 4sc, then 1 sl st,* do this 4 times , Sl st to first st to close.
 |
| round11 finished!! |
Rd 11: ch 1, then sc around in all sts, except in each corner st where you do 2hdc,ch1,2hdc.
Bind off. And I think that is it!
Abbreviated pattern:
Ch4, join to 1st ch to make ring.
rd1: sc6 into ring
rd2: 2sc in each st all around (12 st)
rd3: 2 sc in next st, then 1sc in between, all around (18 st)
rd4: 2sc in next st, then 2sc in between, all around (24 st)
rd5: 2sc in next st, then 3sc in between, all around (30 st)
rd6: 2sc in next st, then 4sc in between, all around (36 st)
rd7: 2sc in next st, then 5sc in between, all around (42 st)
rd8: 2sc in next st, then 6sc in between, all around (48 st)
rd 9: (3sc, 3hdc, 3dc in next st, 3hdc, 2sc) x4
rd10: (2slst, 4sc,1hdc, 4dcin next st, 1hdc, 4sc, 1slst) x4
rd11: sc around ,with 2hdc,1ch,2hdc in each corner st. bind off.
--------------------------------------------
I hope you understand what I mean, I found it hard trying to write instructions, so it might be hard to follow. I hope not. Another thing, I also varied where I put the increases in my circles when I found it was getting too hexie shaped, as long as you keep the right number of sc in between increase stitches, you can put them anywhere.
To make a cushion cover, I made 16 of these and single crocheted them together, like patchwork.
Haven't finished the back yet, but will show you it when I'm done.
Please, if you find any mistakes in this, forgive me! And let me know and I will try and fix it up.
Have a great day!


